The Skull

  • To understand the forms of the face, it helps to understand the underlying structure of the skull.
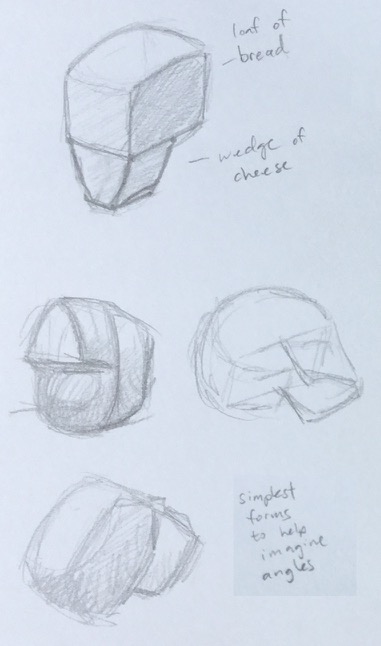
  • Simplified, it looks like a loaf of bread + a wedge of cheese!
  • The advantage of breaking it down into simple forms is to make it easier to visualise at varying angles.

Skull1

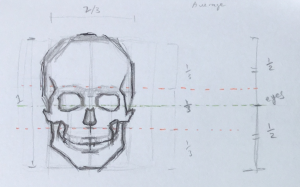
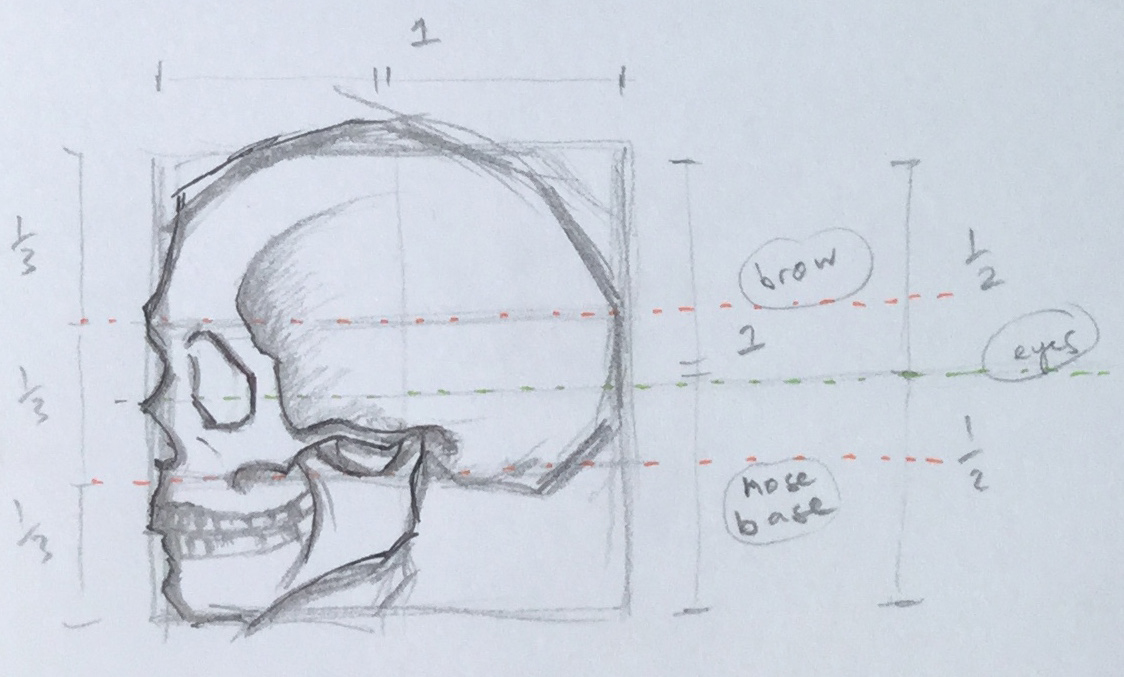
  • Rough guides on average proportions:
    • Eye sockets about the halfway between top and bottom of the head.
    • Eyebrow ridge at the top third.
    • Base of nose at the bottom third.

Skull3 Skull2

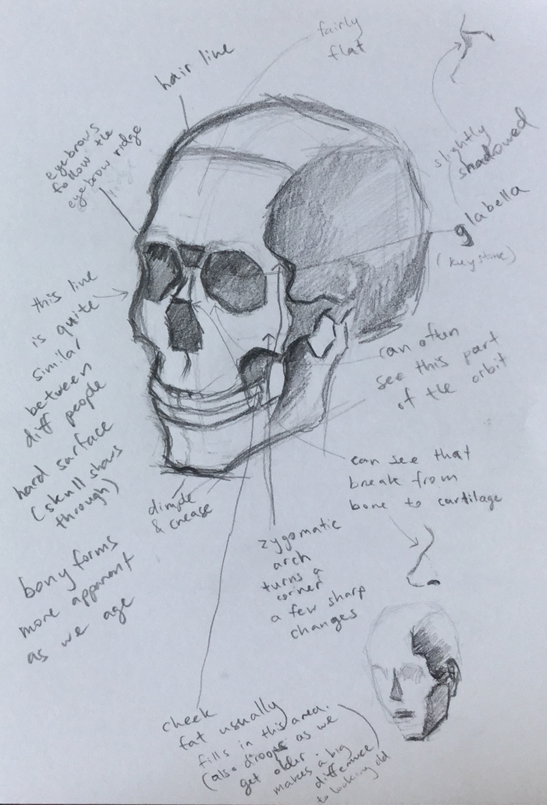
  • Most interesting for artists is probably how the forms of the skull relate to the forms of the face.
  • Top half of the face has very little muscle/fat so the form is mostly determined by the bone:
    • The relatively flat expanse of forehead.
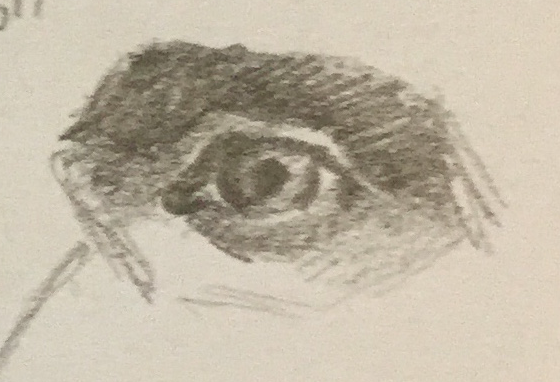
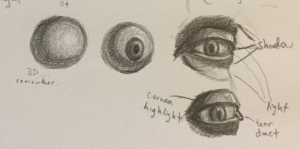
    • Eyebrow ridges that shade the eye sockets.
    • The shadowed area between the brows (glabella)
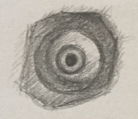
    • On some faces you can see part of the eye socket (usually that inner lower corner has a highlight).
    • The Cheek bones which extend all the way up to the temples. There’s a significant change of plane/light there.
  • The bottom half of the face is a lot more fleshy:
    • The main bony structure visible is the jaw.
    • The rest of the area is softened by fleshy cheeks.
    • The nose is mostly fleshy but should note the bony bridge, especially the little break between where bone ends and cartilage begins.
    • The mouth also follows the shape of the teeth quite closely. (I was so surprised when I saw old photos of my grandpa before he got false teeth, bottom half of his face looked totally different!)

Skull4

Side note: I got this very nice replica skull off ebay. For a plastic skull it’s got a great level of detail and I’ve learnt a lot from being able to refer to it while sketching an actual face. Also being able to hold it and feel all the changing planes from a tactile point of view helps everything sink in.

Skull

Notes on facial features – mouth

  •  Start with the shaped centre-line. (Consistent for all people due to the way lip is formed in pre-natal development)

Lip1

Lip_Lol

  • The centre-line is the darkest part of the mouth.
  • The plains of the upper lip face downwards (in shadow).
  • The plains of the lower lip faces upwards (lit).
  • As you go towards the sides of the lower lip, that dark lip edge gets softer. The lip protrudes but flattens out towards the sides so the shadows are not as strong.

Lip2

  • The teeth/jaw area is actually quite strongly curved (compared to say, the brow area). Take note of this when working with the lip in perspective.

Lip3

Notes on facial features – nose

Mapping:

  • Common beginner oversight: making the nose too long.
  • Usually, the tip of the nose lies halfway between the brows and the chin. There are exceptions but it’s a good idea to do a double check on nose length.

Nose1

  • Helps to start with an oblong sort of shape.
  • There aren’t actually many hard edges on a nose, which is why it’s a bit tricky. You can exaggerate the lines a little to give it a bit more structure.

nose2

  • The end of the nose is a globy sort of protrusion.
  • The nostrils face down so they’re sitting amongst the shadowed areas of the nose. (So they’re actually quite subtle. There is a tendency to make them stand out too much).
  • There is a darker step area between the tip and the nostril highlights.

nose3

  • Something I’ve noticed: I have a tendency to forget perspective and make the nose too wide in 3/4 view.

nose4

Notes on facial features – eyes

  • The eye sits in its socket held up by various muscles and padded by fat.

Eye2 Eye3

  • It helps to start with the eyeball as a lit sphere (to make sure you’re thinking about it as a 3D structure rather than something flat.)
  • When placing the iris and pupil, take care that they’re in the right perspective.
  • The lids are where a lot of the light and shadow changes happen:
  • The upper lid is kind of opposite to the lower lid in terms of where the light hits.
    1. So while the lash line is dark on the upper lid (due to it facing down), it’s comparatively light on the lower. This is for typical lighting where the light source is coming from above.
    2. Similarly the fleshy bit of the upper lid tends to face the light and is lighter while the lower lid is in shadow.
    3. Then, the surrounding area beyond the lid is again reversed – the area under the brow is shadowed while the area of the upper cheek is lit.

Eye

  • Extra touches: There is a little refracted highlight from the cornea.

Eye4 Cornea

What’s in a face?

I’ve been working through some online portrait drawing classes by Gary Faigin on Craftsy. They are really fantastic. Gary Faigin is a very systematic teacher and I highly recommend the classes for anyone looking for a logical approach to portraits. It’s not about creating the closest copy possible. It has more to do with what we notice as humans when we look at a face. The first course in the series is free, a great intro and quite fun to do.

I’ve been taking notes, just to jot down some of the things I found most useful. Will fill this in eventually. The notes are in scribble form at the moment and I’d like to convert them to something I can still understand months later.


There is also a book: The Artist’s Complete Guide to Facial Expression that I hear is a staple reference for digital artists.

Something New – Life Drawing

In an effort to get more immersed in the art community, I’ve started going to life drawing sessions. These sessions have no instructors, you just leave your $5 at the door and enter an artfully-lit room full of people sketching away in front of a live model. The cool thing is that the sessions push you to work quickly and don’t give you much time to criticise your work. The first time I was there, the model started with a series of 2 minute poses that left me scrambling to figure out where to start. In an effort not to freeze up and feel intimidated I decided to just concentrate on blocking out the main torso area. It was a little awkward at first, then you started to get into the flow and slowly lose the self consciousness.

These were some of my first attempts:


Turns out these quickies are a pretty fantastic way to warm up and the speed with which you have to work helps you stop drawing in those furry little strokes that tend to happen when you are being to precious about things. After a while the model moves onto some longer poses that give you more time to explore and hone your style and technique. By the end of the first session I was actually pretty pleased with how comfortable I was getting. I was able to find enough spare braincells to start bringing out aspects of the picture that were interesting to me. (I don’t know how exactly to describe it but I really enjoyed empathising on the weight/balance/grounded-ness of a figure.)


A few sessions later, my friends and I were throwing mini challenges for each other. For example, draw the next pose without lifting your pencil off the paper (again, helping to minimise those furry lines).

SingleLine

The body was done as a single line. Gave up at the head haha.


NoLines

Another challenge was to do away with lines and concentrate on the tone.

The experiments don’t always work out but it keeps things fun and I think does help you learn faster. One thing I’ve been trying to do is to take more risks. When you always play safe and aim to produce perfect/pleasing work all the time, you often miss out on the opportunity to learn laterally. It seems true in a lot of contexts that some things have to get worse before they get better.

Other strats for making progress: Focusing on one area at a time. Each model is different and sometimes it’s more fun to concentrate on something that is unique to the model. For example, week 1’s model was curvy and it was fun studying tone on her back and belly. In contrast, week 2’s model was lean, long-limbed and flexible, spent most of the time studying her legs.

Legs2 Legs

Week 3’s model had amazing ways of angling her hips and shifting her weight around. In the words of a friend “she’s like a freaking greek statue!” (Dynamic was a word of praise I heard thrown around a lot by the other people in the session.)

Hips2

Hips1 ShadowNegativeShapes

I’ve really enjoyed these sessions so far. Apart from expanding my skills and giving me a newfound confidence for capturing the moment, they are also very soothing. You are able to cast all your thoughts away and just focus on the task at hand. Later you can go back, reflect on your progress and make plans for what you want to practice next session.

So that’s something new I’ve been trying. What about you guys? Anything new obsessions?